The Simulation with the “SimulationPlus” component: Difference between revisions
From Ameise-en
Jump to navigationJump to search
No edit summary |
No edit summary |
||
| (15 intermediate revisions by the same user not shown) | |||
| Line 2: | Line 2: | ||
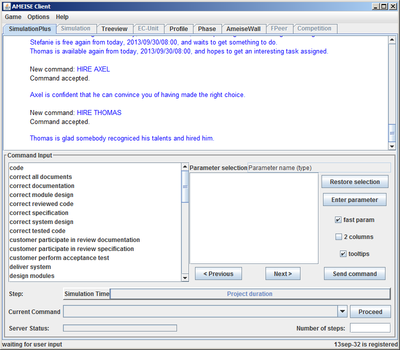
Below, you can see the | Below, you can see the interface of the "SimulationPlus" component. Via mouse clicks, the commands are chosen and combined from a list of documents and parameters. They are send to the simulation core via the '''Send command''' button. For a small animation, please click on the image below. | ||
[[Image: | [[Image:Screenshot2_en.png|center|400px|thumb|You can find the demo on the [[Special:ViewletDemos|Demos]] page]] | ||
===Description=== | ===Description=== | ||
'''1. The | '''1. The Interface''' | ||
{| style="width:100%;padding-left:1em;" | {| style="width:100%;padding-left:1em;" | ||
|- | |- | ||
|The SimulationPlus component is an extension of the user | |The "SimulationPlus" component is an extension of the SESAM user interface. With this component, trainees don’t have to type every single command into a text box. They can easily select them by mouse clicks. This component is introduced in the following. | ||
[[Image: | |||
[[Image:simplus.png|left|400px|thumb]] | |||
|} | |} | ||
| Line 21: | Line 23: | ||
{| style="width:100%;padding-left:1em;" | {| style="width:100%;padding-left:1em;" | ||
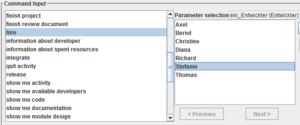
|Commands are selected by mouse clicks from a predefined list of commands. In the following example, the command "hire Richard" is selected. This means that the developer Richard will be hired from the pool of available developers. | |||
| Commands are selected by mouse | |||
[[Image:simplus1.png|left|300px|thumb]] | |||
|} | |||
After selecting a command, click on the button «Send command». | {| style ="width:100%;padding-left:1em;" | ||
|After selecting a command, one has to click on the button «Send command». | |||
[[Image: | [[Image:simplus2.png]] | ||
|} | |} | ||
| Line 36: | Line 41: | ||
{| style="width:100%;padding-left:1em;" | {| style="width:100%;padding-left:1em;" | ||
|- | |- | ||
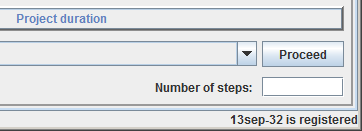
|There are two possibilities to | |There are two possibilities to proceed the time during a simulation run: | ||
'''a) | '''a) Step in time day by day:''' To advance the simulation time by one day, click on the button «Proceed». | ||
{| style="width:100%;padding-left:1em;" | {| style="width:100%;padding-left:1em;" | ||
|- | |- | ||
|[[Image: | |[[Image:simplus3.png]] | ||
|} | |} | ||
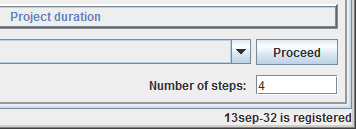
'''b) | '''b) Step in time by several days:''' To advance the simulation time by several days, enter the amount of steps (days) and then click on the Button «Proceed». | ||
{| style="width:100%;padding-left:1em;" | {| style="width:100%;padding-left:1em;" | ||
|- | |- | ||
|[[Image: | |[[Image:simplus4.png]] | ||
|} | |} | ||
|} | |} | ||
| Line 57: | Line 62: | ||
{| style="width:100%;padding-left:1em;" | {| style="width:100%;padding-left:1em;" | ||
|- | |- | ||
|The feedback from the simulator is shown in the simulation window. | |The feedback from the simulator is shown in above part of the simulation window. Some examples of feedback presented: | ||
{| style="width:100%;padding-left:1em;" | {| style="width:100%;padding-left:1em;" | ||
|- | |- | ||
| style="width:100%" | | | style="width:100%" | | ||
* '''Feedback after "Proceed":''' After a proceed | * '''Feedback after a "Proceed":''' After a proceed the simulation date is increased by one workday. | ||
{| style="width:100%;padding-left:1em;" | {| style="width:100%;padding-left:1em;" | ||
| Line 72: | Line 77: | ||
|} | |} | ||
* ''' | * '''Feedback when a developer has finished his work:''' When a developer has finished his activity, there is also a feedback. In the following example, the developer Axel has finished working on the specification. | ||
{| style="width:100%;padding-left:1em;" | {| style="width:100%;padding-left:1em;" | ||
Latest revision as of 11:37, 17 May 2013
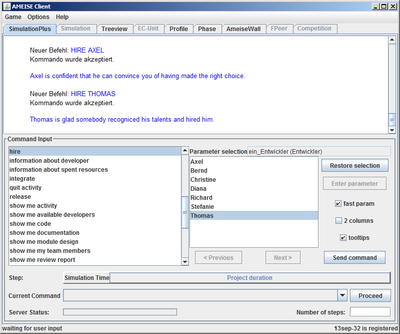
Below, you can see the interface of the "SimulationPlus" component. Via mouse clicks, the commands are chosen and combined from a list of documents and parameters. They are send to the simulation core via the Send command button. For a small animation, please click on the image below.
Description
1. The Interface
2. Entering Commands
| After selecting a command, one has to click on the button «Send command». |
3. Advancing the Simulation Time
4. Feedback from the Simulator
The feedback from the simulator is shown in above part of the simulation window. Some examples of feedback presented:
|
